Working with Files
Create pages, components, and blog posts. Understand the project structure and manage your files.
Working with Files
This guide covers creating and managing files in your PhantomWP project, including pages, components, layouts, and blog posts.
Project Structure
Every PhantomWP project follows the Astro folder structure:
src/
  components/     # Reusable UI components
  layouts/        # Page layouts (header, footer, etc.)
  media/          # Images (Astro-optimized)
  pages/          # Site pages (URL = file path)
    blog/         # Blog posts
  styles/         # CSS files
  data/           # JSON data files
public/           # Static files (favicon, etc.)
Key Folders
| Folder | Purpose |
|---|---|
src/pages/ | Each file becomes a page. about.astro = /about |
src/pages/blog/ | Blog posts in MDX format |
src/components/ | Reusable components to import in pages |
src/layouts/ | Page templates with header/footer |
src/media/ | Images with automatic optimization |
public/ | Files served as-is (favicon, robots.txt) |
Creating Pages
Creating a New Page
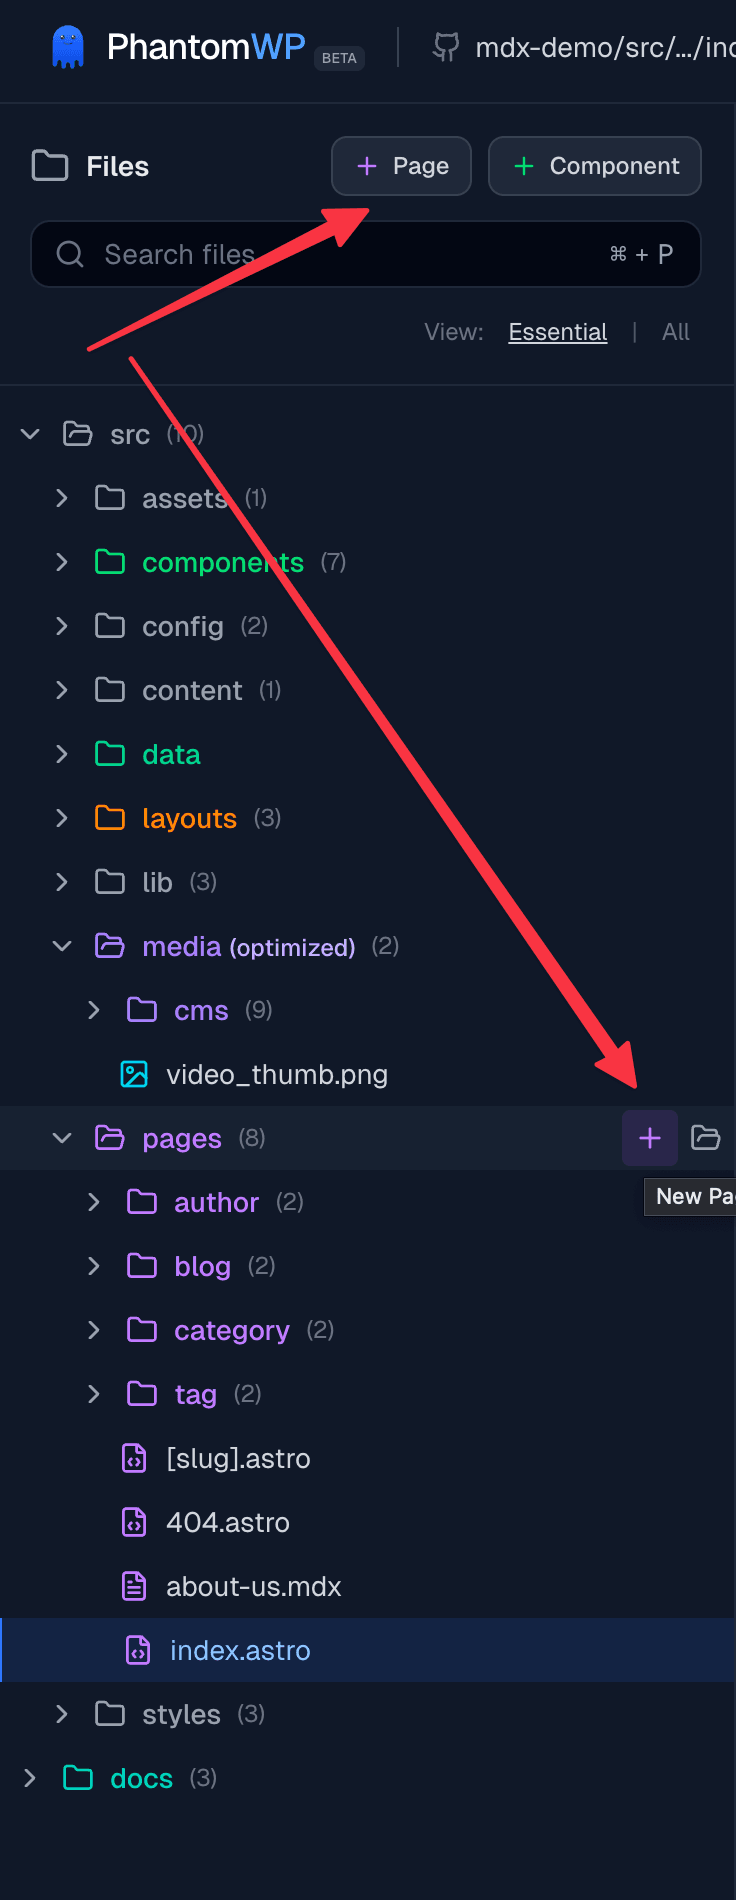
There are two ways to create a page with the + button:
- Click the + Page button in the File Tree header toolbar
- Click the + button that appears next to the
src/pagesfolder when you hover over it
Create Page Modal
The Create Page modal lets you configure your new page:
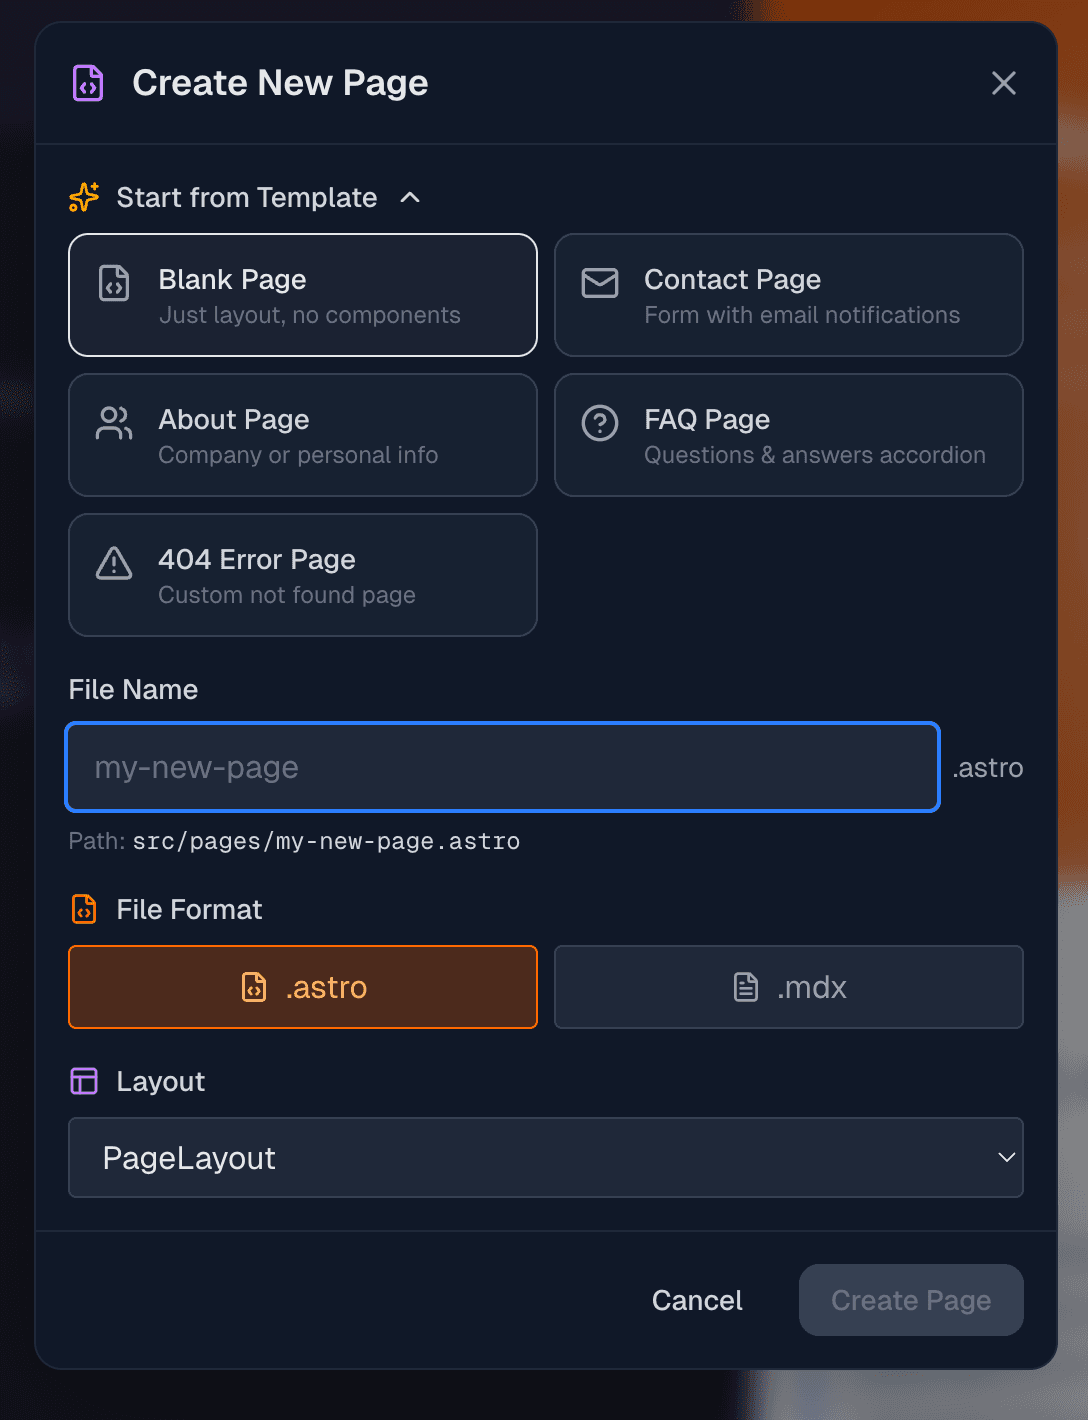
Page Templates
Choose a starting template:
| Template | Description |
|---|---|
| Blank Page | Empty page with just the layout |
| Contact Page | Form with email notifications |
| About Page | Company/personal info sections |
| FAQ Page | Accordion-style Q&A |
| 404 Error Page | Custom not found page |
File Format
Choose between:
- .astro - Full control with components and logic
- .mdx - Markdown with component support (great for content-heavy pages)
Layout Selection
Select which layout to use:
- BaseLayout - Minimal wrapper
- PageLayout - Standard page layout
- ContentLayout - Optimized for text content (prose styling)
Contact Form Backend
For Contact pages, configure the form service:
- Formspree - Enter your Form ID
- Web3Forms - Enter your Access Key
- Configure later - Add the backend manually
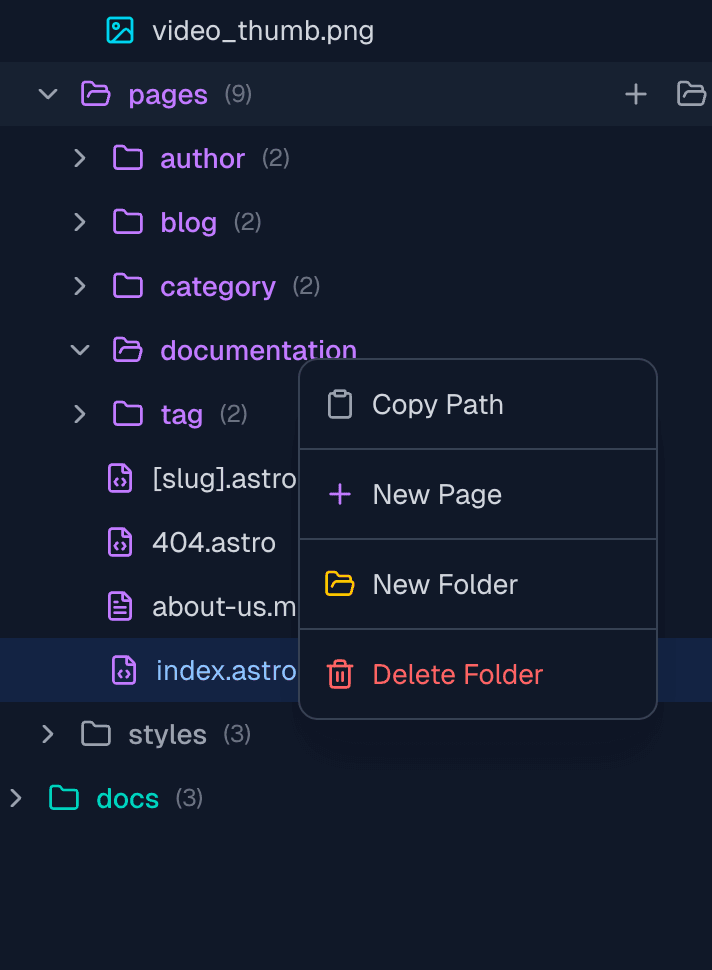
Creating Pages in Subfolders
To create nested URLs like /services/web-design:
- Right-click the parent folder (e.g.,
src/pages/services) - Select New Page
- The page will be created in that folder
Page File Names and URLs
File names become URLs:
| File Path | URL |
|---|---|
src/pages/index.astro | / |
src/pages/about.astro | /about |
src/pages/services/design.astro | /services/design |
src/pages/blog/my-post.mdx | /blog/my-post |
Creating Components
Components are reusable pieces of UI. Create them in src/components/.
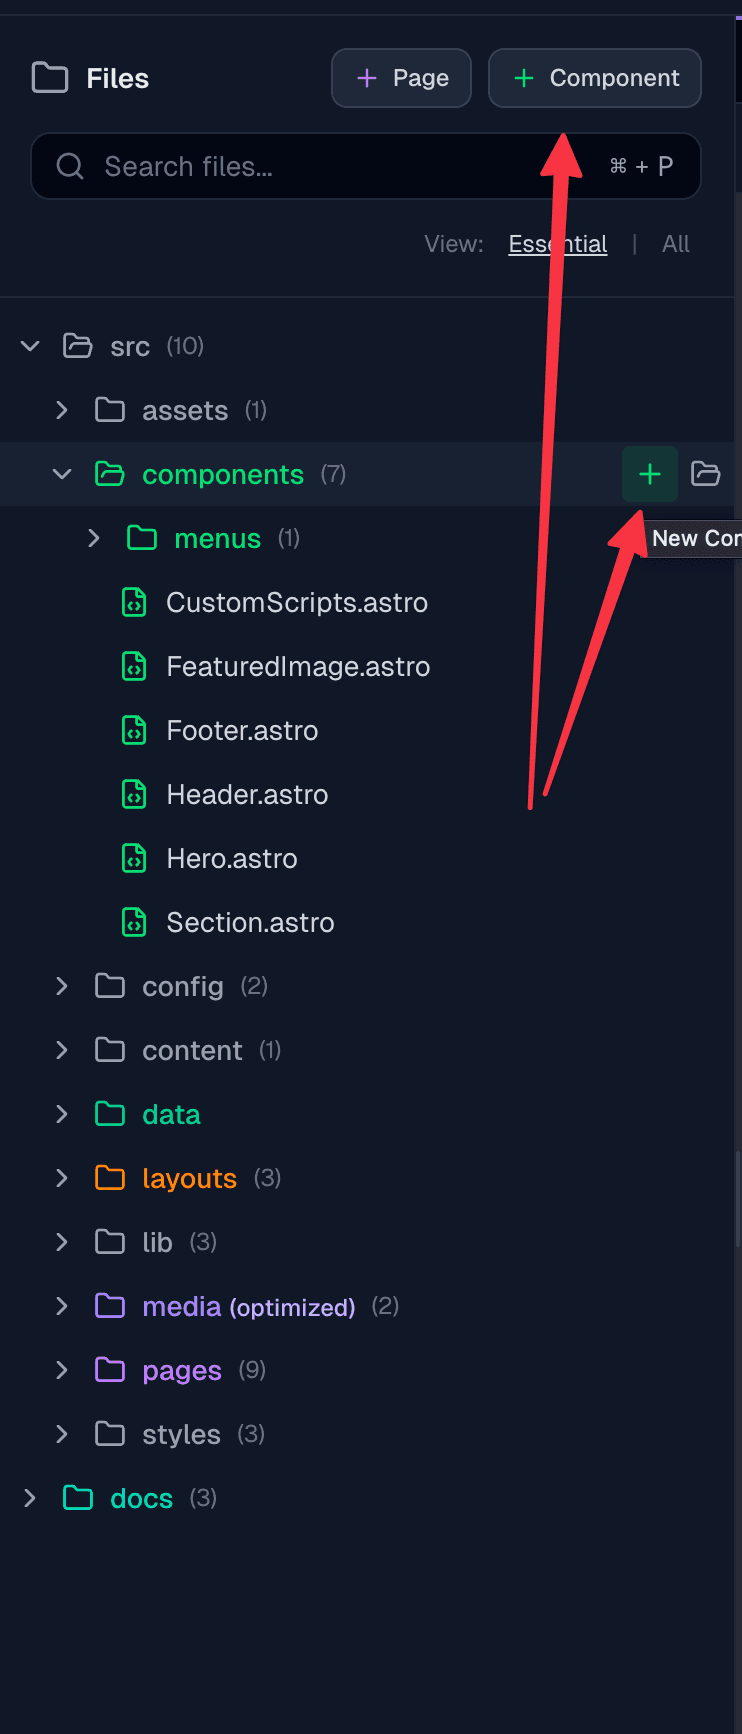
Creating a New Component
There are two ways to create a component:
- Click the + Component button in the File Tree header toolbar
- Click the + button that appears next to
src/componentswhen you hover over it
Via Context Menu
- Right-click
src/components(or any subfolder) - Select New Component
Create Component Modal
The Create Component modal lets you configure your new component:
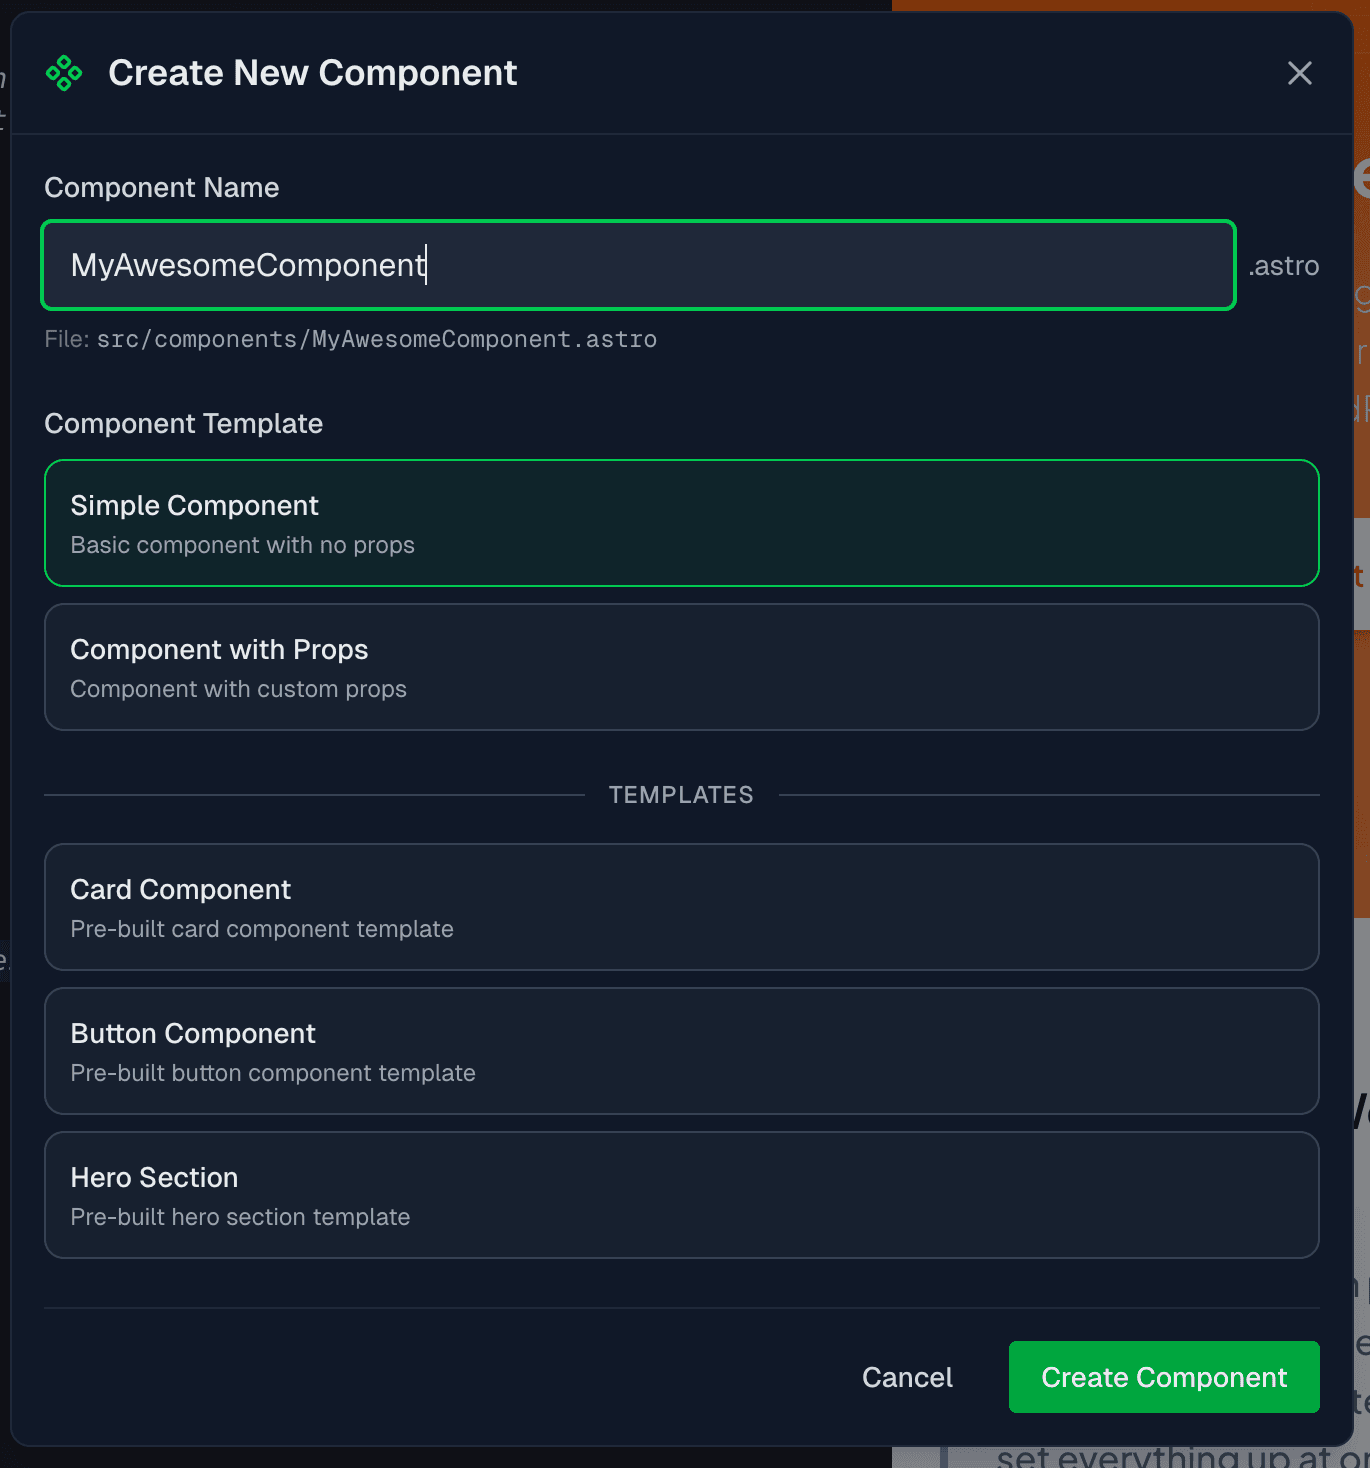
Component Name
Enter a name for your component. It will be converted to PascalCase automatically (e.g., "my card" becomes "MyCard").
Component Templates
Choose a starting template:
| Template | Description |
|---|---|
| Simple Component | Basic component with no props |
| Component with Props | Customizable props interface |
| Card Component | Pre-built card template |
| Button Component | Pre-built button template |
| Hero Section | Pre-built hero section |
For "Component with Props", you can define custom props with names, types (string, number, boolean), and default values.
Component File Structure
A basic component looks like this:
---
// Props interface
interface Props {
  title: string;
  description?: string;
}

const { title, description } = Astro.props;
---

<div class="card">
  <h3>{title}</h3>
  {description && <p>{description}</p>}
</div>
Using Components
Import and use components in your pages:
---
import Card from '../components/Card.astro';
---

<Card title="My Card" description="Card content here" />
Extracting Components
Turn any section of a page into a reusable component.
From the HTML Tree View
- Open the Tree tab in the right panel
- Right-click an element
- Select Extract Component
- Enter a component name
- The code is moved to a new file and replaced with a component tag
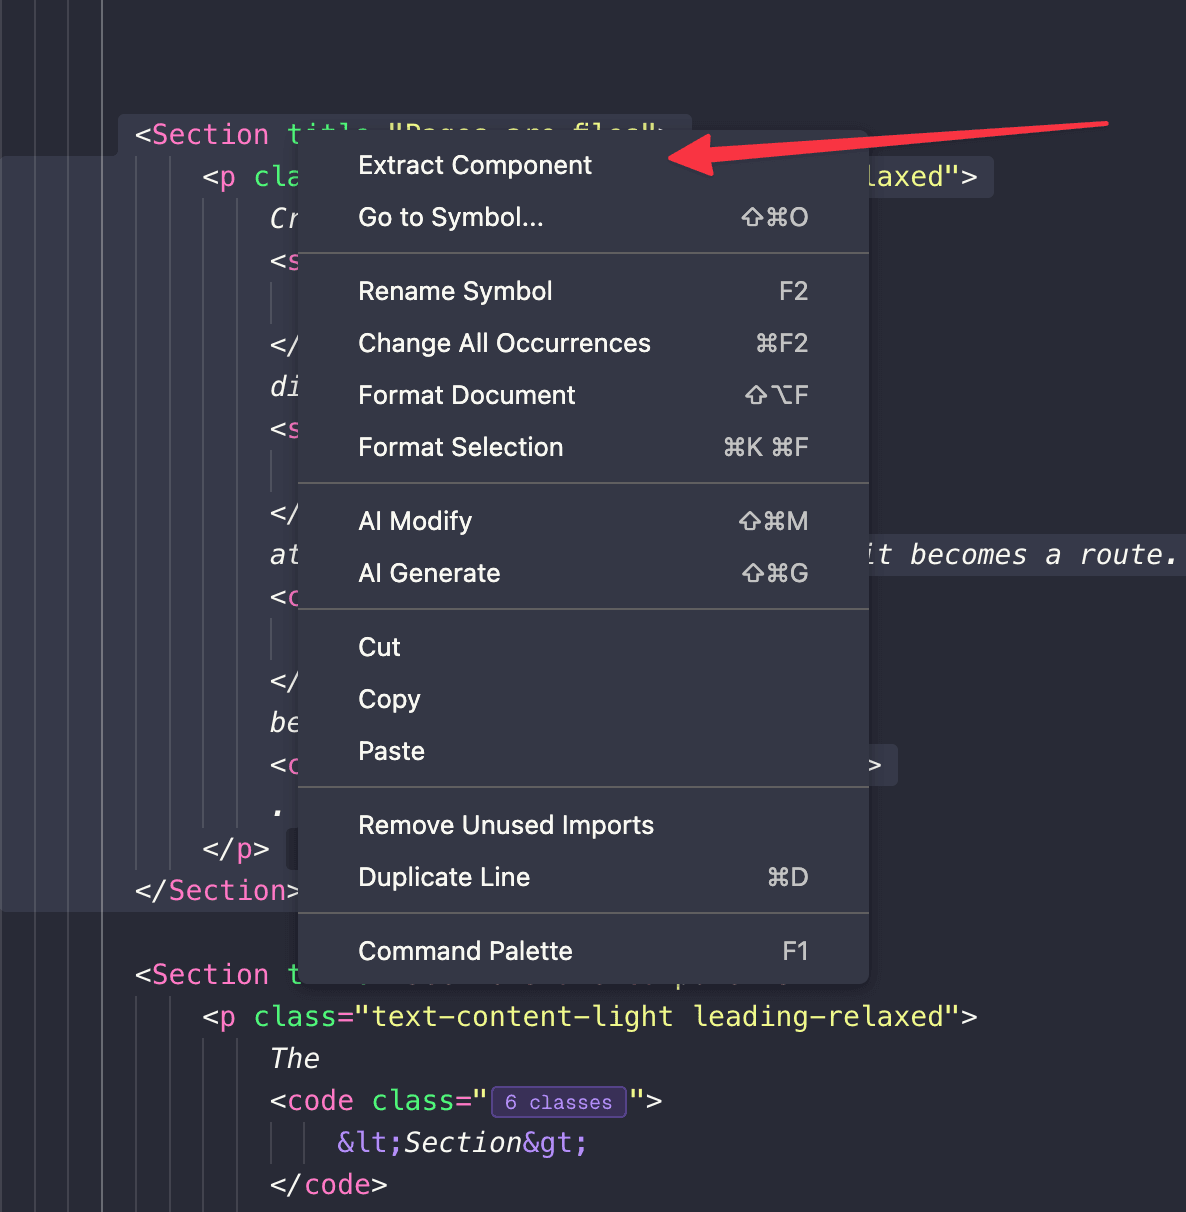
What Happens
When you extract a component:
- The selected HTML/JSX is copied to a new file
- The file is created in
src/components/ - The original code is replaced with
<ComponentName /> - The import is added to the page automatically
Before:
<section class="hero">
  <h1>Welcome</h1>
  <p>Hero description</p>
</section>
After:
---
import Hero from '../components/Hero.astro';
---

<Hero />
Creating Blog Posts
Blog posts are created in src/pages/blog/ as MDX files.
Creating a New Blog Post
- Click the + button next to
src/pages/blog - Or right-click
src/pages/blogand select New Blog Post
Blog Post Structure
Blog posts use MDX (Markdown with components):
---
title: "My Blog Post"
description: "A short description"
pubDate: 2024-01-15
author: "Your Name"
tags: ["tutorial", "astro"]
---

# Introduction

Write your content in Markdown...

## Using Components

You can import and use components:

import Card from '../../components/Card.astro';

<Card title="Example" />
Blog Post Frontmatter
Common frontmatter fields:
| Field | Description |
|---|---|
title | Post title (required) |
description | Short summary for SEO |
pubDate | Publication date |
author | Author name |
tags | Array of tags |
image | Featured image path |
draft | Set to true to hide from listing |
Creating Layouts
Layouts wrap your pages with common elements like headers and footers.
Via Context Menu
- Right-click
src/layouts - Select New Layout
- Enter a name (e.g., "BlogLayout")
Layout Structure
---
interface Props {
  title: string;
  description?: string;
}

const { title, description } = Astro.props;
---

<!DOCTYPE html>
<html lang="en">
<head>
  <meta charset="UTF-8" />
  <meta name="viewport" content="width=device-width" />
  <title>{title}</title>
  <meta name="description" content={description} />
</head>
<body>
  <header>
    <!-- Navigation -->
  </header>

  <slot />

  <footer>
    <!-- Footer content -->
  </footer>
</body>
</html>
Using Layouts
Wrap your pages with a layout:
---
import BaseLayout from '../layouts/BaseLayout.astro';
---

<BaseLayout title="My Page">
  <main>
    <!-- Page content goes in the slot -->
  </main>
</BaseLayout>
Managing Files
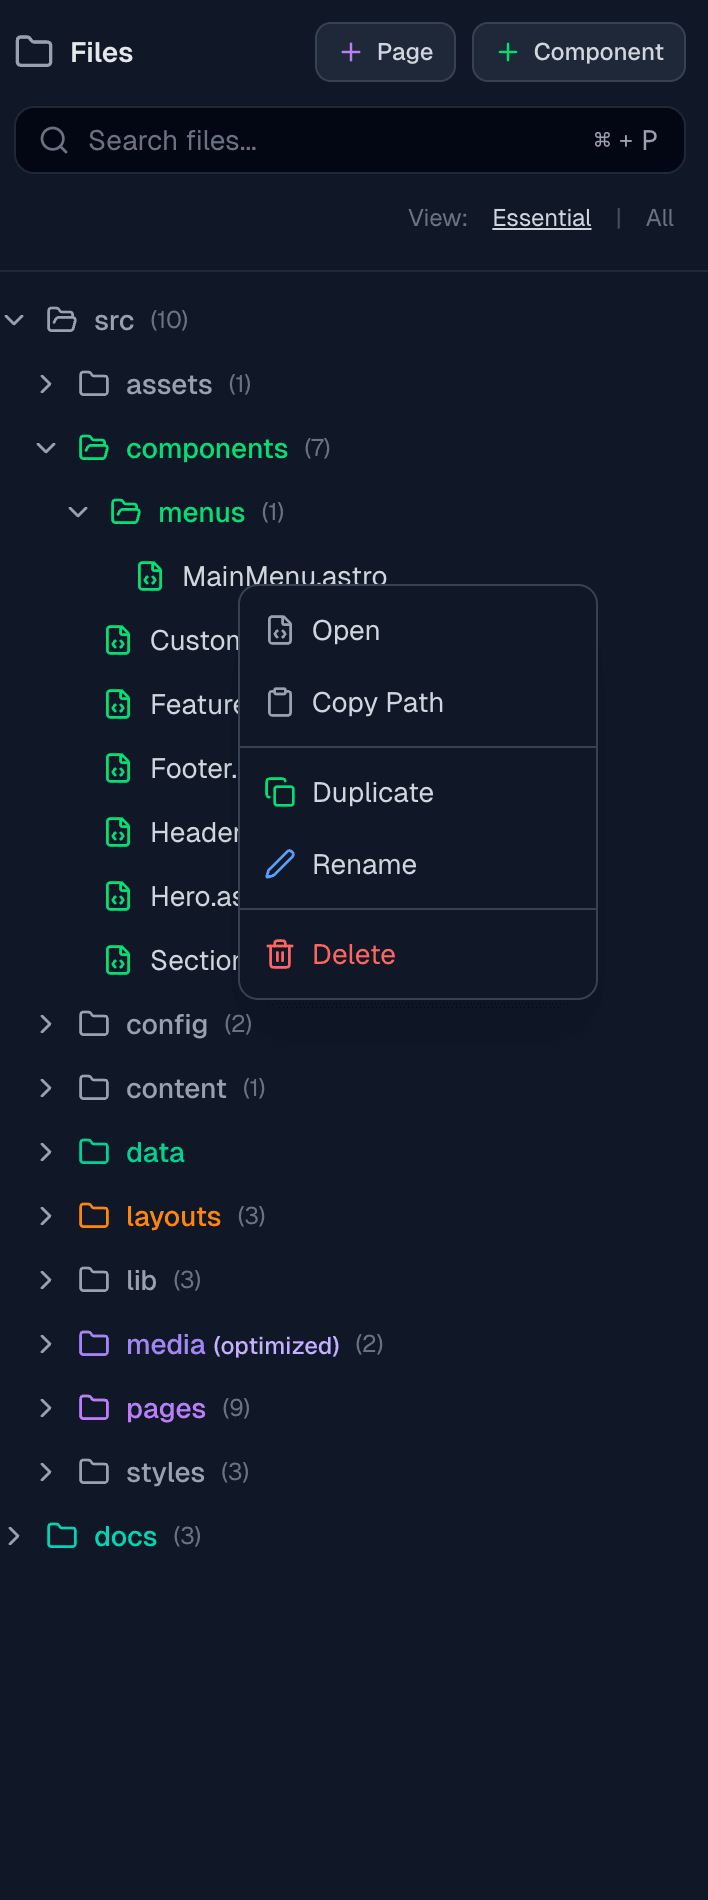
Renaming Files
- Right-click the file
- Select Rename
- Enter the new name
- Press Enter
Or click the pencil icon that appears on hover.
When you rename components or layouts, PhantomWP automatically updates all import statements in files that reference them.
Duplicating Files
- Right-click the file
- Select Duplicate
- Enter a new name
- Click Duplicate
Moving Files
Drag and drop files between folders:
- Click and hold a file
- Drag to the target folder
- Release to move
Files can only move within their section (pages stay in pages, components in components). When you move components or layouts, all import paths are updated automatically.
Deleting Files
- Right-click the file or folder
- Select Delete
- Confirm the deletion
Creating Folders
- Right-click the parent folder
- Select New Folder
- Enter a name
- Press Enter
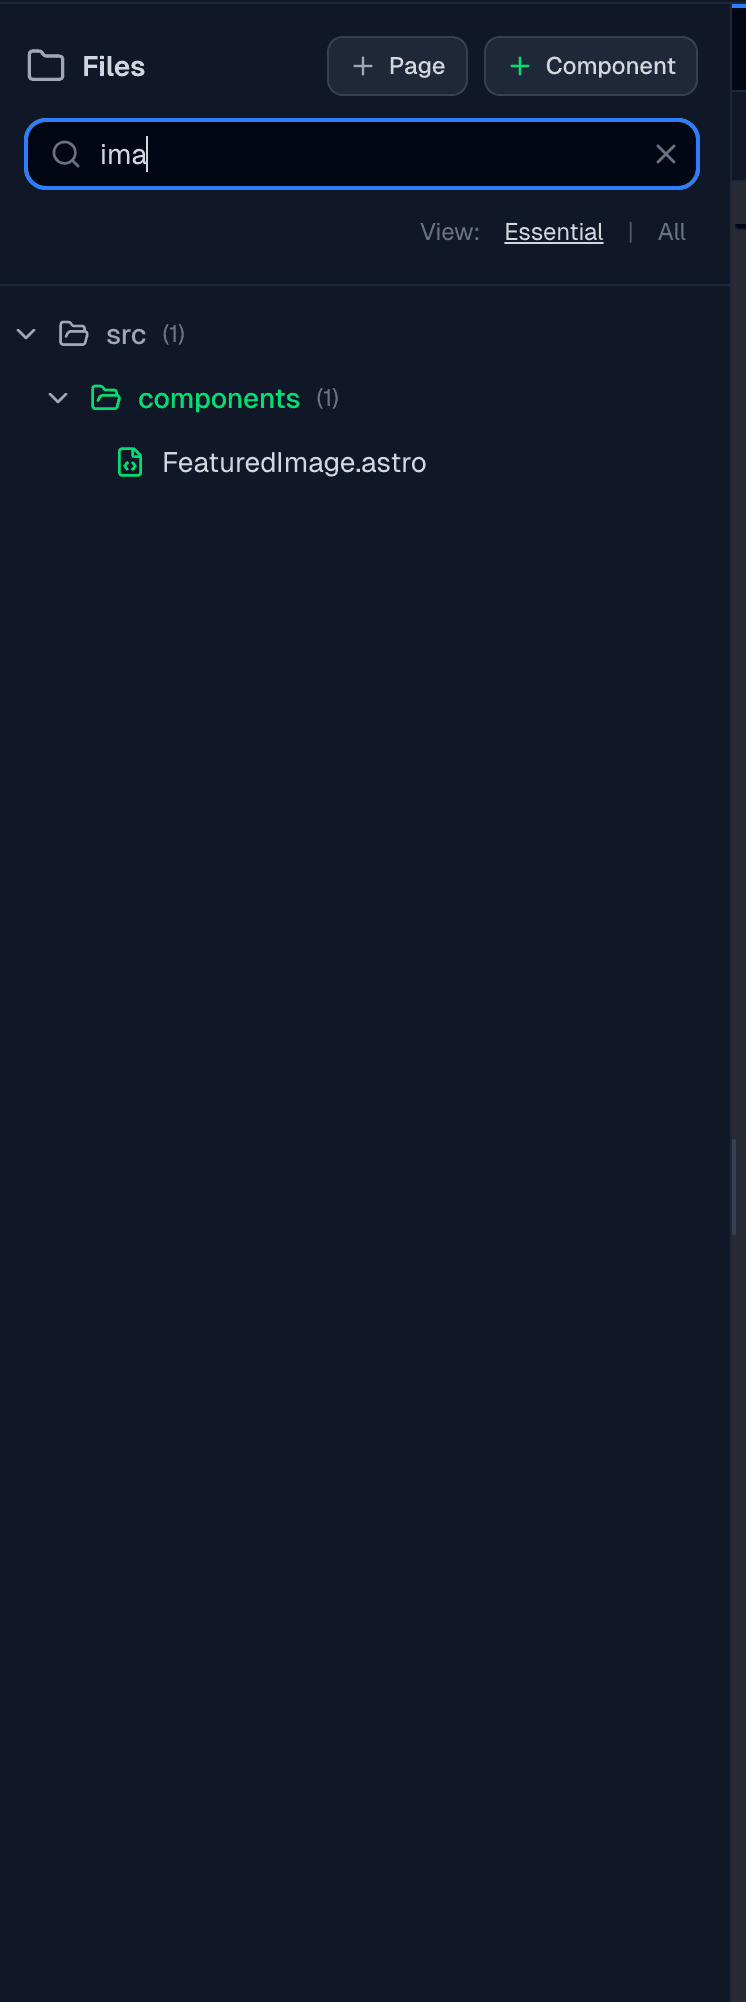
File Search
Use the search bar at the top of the File Tree:
- Click the search icon or press
/ - Type part of the filename
- Results filter in real-time
Quick Reference
| Action | How To |
|---|---|
| New Page | + button on src/pages or right-click > New Page |
| New Component | + button on src/components or right-click > New Component |
| New Blog Post | + button on src/pages/blog or right-click > New Blog Post |
| New Layout | Right-click src/layouts > New Layout |
| Extract Component | Right-click element in Tree View > Extract Component |
| Rename | Right-click > Rename or click pencil icon |
| Duplicate | Right-click > Duplicate |
| Delete | Right-click > Delete |
| Move | Drag and drop to target folder |
| Search | Press / or click search icon |
Next Steps
- Visual Editor - Edit components visually
- Component Library - Browse pre-built components
- Media Manager - Add images to your pages